Contribution Manual
Contents |
Introduction
This manual was written with the purpose of facilitating the contribution process to ROP, which was launched to become a central place for the exchange of robotic hardware designs through embedded wiki pages. Comparable to open source software, companies and research institutions can release their robot hardware design on ROP under an open hardware license. The essence of sharing open-source hardware is sharing the design files, but there are many other hardware design-related files that can decrease the development efforts required to build a robot. Please note that you are not required to post all files discussed below, but the more you contribute, the faster your design will be adopted by the community. The contents of this page were mainly based on a work of the Open Source Hardware Association (OSHWA) on the best practices for sharing open-source hardware.
If any questions arise, please do not hestitate to contact the ROP webmaster.
Preparing the contribution of your project
For the sake of a neat and tidy wiki, you are encouraged to prepare as much information as possible prior to posting on the wiki, and uploading as much as possible at once. This is to prevent projects from remainging halfway finished on the wiki for prolonged periods. The following gives a guideline for some of the files and descriptions you should consider sharing on ROP. For your convenience a checklist of the possible elements of a robotics project is included.
The minimum you are required to publish for a ROP contribution is:
- Summary
- Overview
- Bill Of Materials
- 3D CAD designs
- Electrical schemes
- Software
- Licensing
Elements of a ROP contribution
This section describes some of the files you should consider sharing when publishing your project on ROP.
Summary
The project description should include a brief summary describing the robot's identity and purpose. Furthermore please provide hyperlinks to:
- Author: the author's website
- License: the license your project is published under
- Hardware: the hardware repository
- Software: the software respository
Overview
|
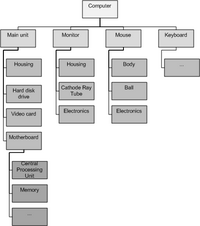
The project description should include a clear description of the robot functionality and an overview of the robot layout. A component hierarchy or product breakdown structure is also very beneficial for the comprehensibility of the robot structure, see Figure 1 for an example. |
Specifications
A list of specifications should be included with the project description, preferably partitioned in accordance with the robot component division. The specifications can include, but are not limited to:
- Construction: Overall dimensions, weight etc.
- Electrical: Batteries, motors etc.
- Computers and processors used etc.
- Communication: Network technology used etc.
- Sensors: E.g. audio or vision components
- Software: Operating system etc.
- Degrees of Freedom: DOFs of respective components
Design Files
Sharing the original design files is the core practice of open-source hardware development. This is important because the original design files constitute the source code for the hardware. To maximize the ability of others to view and edit the source files, it is recommended to use free open-source software to create the original designs. All design files should be version controlled.
In addition to the original design files, it is often helpful to share your design in additional, more accessible and commonly used interchange and export formats. Moreover it can also be helpful to share ready-to-view outputs that can easily be viewed by end users such as a PDF of a technical drawing or a 3D viewer of the robot design.
Examples of design files you should consider including are:
- 3D CAD designs
- Assemblies and parts
- 3D designs ready for e.g. 3D printing, molding etc.
- Component libraries e.g. fastener libaries
- Formats: native, STEP, STL
- 2D CAD drawings
- 2D designs ready for e.g. laser cutting
- Formats: native, DXF, SVG, PDF
- Circuit board CAD files
- Electrical schemes
- PCB layouts
- Formats: native, PDF
- Electrical wiring
- Cable layouts, connector pinouts etc.
- Formats: native, PDF
- Technical drawings
- Engineering drawings showing dimensions and tolerances
- Exploded views
- Formats: native, PDF
- Machining code
- Code for machining a part
- Formats: e.g. G-code, STEP-NC, STL
Bill of Materials
|
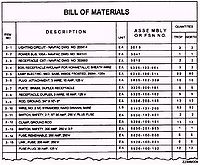
It is very important to provide a separate Bill of Materials (BOM) in addition to the design files for the community to easily reproduce your robot design. The BOM - see Figure 2 - is a list of the assemblies, components and parts needed to build the robot. Include as much useful infomation as possible, such as:
Make sure that it is easy to tell which item in the bill of materials corresponds to which component in your design files. It would be wise to name e.g. the CAD files in accordance with the BOM item numbers and descriptions. Furthermore try to build up the BOM according to the component hierarchy and to include diagrams indicating which part goes where. |
Software and Firmware
Any software or firmware code required to operate your robot should be shared so the community can modify it along with their hardware modifications. Proper documentation of the code significantly improves the probability that your code will be adopted and further developed by the community, so please include as much documentation as possible. It would also be helpful to provide information on the the stability and robustness of the software.
Instructions and Documentation
In addition to the design files you should share all documentation available, as all explanations of your robot are invaluable in helping others to modify or manufacture your robot. Examples include, but are not limited to:
- Manufacturing instructions
- Assembly instructions
- User manuals
- Design rationale
- System architecture
Photos
Including photos of your robotic project helps people to understand what your project is. Try to include photos of the overall robot and details from multiple viewpoints and at various stages of assembly to facilitate those striving to reproduce the robot.
Publishing on ROP
The first step you should take before you can publish on ROP is to request an account on the login page.
Requesting an account
|
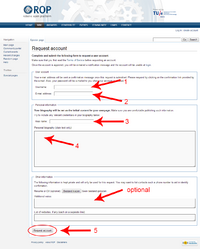
You are then asked to choose a username and specify your e-mail address indicated in Figure 3 as (1) and (2). Then after adding information on your real name (3) and a biography (4) and some optional additional information, you can send your account request (5). The request is then evaluated by the ROP webmaster and once accepted you will be notified by e-mail. Please fill in at least some details on your account, so your account request will be filtered from all the spam ROP receives. |
Wiki Style Guide
Once your account has been activated you can create pages on the wiki. To ensure a consistent style and layout throughout the wiki, you are asked to follow a style guide, which can be found here.
Hosting Design Files
For a contribution to ROP, you are required to host your design files at the ROP repository. Please contact the ROP webmaster for an account. The ROP repository is running Apache Subversion, so you will be asked to install a client.
Especially in hosting your design files it is of importance to have them properly structured and arranged into subfolders. You are required to use the following directory tree:
- Bill Of Materials
- Electrical Designs
- Circuit Boards
- Schemes
- <<Native Format>>
- PCB Layouts
- <<Native Format>>
- Schemes
- Wiring Schemes
- <<Native Format>>
- Circuit Boards
- Instructions
- Assembly Instructions
- Manufacturing Instructions
- User Manuals
- License
- Mechanical Designs
- 3D CAD Models
- <<Native Format>>
- STEP
- Technical Drawings
- <<Native Format>>
- Manufacturing Files
- 2D Cuttable Files
- <<Native Format>>
- 3D Printable Files
- <<Native Format>>
- STL
- 2D Cuttable Files
- Machining Code
- 3D CAD Models
- Photos
- Parts
- Assembled
- Software
- Code
- Documentation
Licensing
The use of licenses is important to signal others how they can use your work. There are many open-source licenses, but they can be roughly divided in two categories: copyleft and permissive licenses. Copyleft licenses are licenses which require that derivatives be licensed under the same open-source terms, whereas permissive licenses allow others to make modifications without releasing them as open-source hardware. For a contribution to ROP you are free to choose an open-source license, as long as the ROP visitors are free to use your designs and further develop them. In any case, be sure to be crisp clear on which license applies to which design.
Popular copyleft licenses include:
- Creative Commons Attribution, Share-Alike (BY-SA)
- GNU General Public License (GPL)
- Hardware-Specific Licenses: TAPR OHL, CERN OHL
Popular permissive licenses include:
Checklist
To summarize, there are numerous possible elements of a ROP contribution; consider the following checklist to ensure you have included all information at hand in your contribution.
- Summary
- Overview
- Component hierarchy
- Specificatons
- Bill Of Materials
- Design files
- 3D CAD designs
- 2D CAD drawings
- Circuit board CAD files
- Electrical wiring
- Technical drawings
- Machining code
- Software/firmware
- Code
- Documentation
- Instructions/documentation
- Manufacturing instructions
- Assembly instructions
- User manuals
- Design rationale
- System architecture
- Photos
- Licensing
- 3D Viewer


