TURTLE Base
| Robot Links |
| Author |
| TU/e |
| CST Group, TU/e |
| rop@tue.nl |
| CAD Files |
| Inventor |
| Step |
| Electronic Drawings |
| Software |
| Software |
| Software Flow Charts |
| Scheme |
| Motion |
| Vision |
| World Model |
| License |
| License Files |
TURTLE: Base | Upper Body | Ball Handling and Kicking Mechanism | 8-Wheeled Base
Contents |
Part Summary
The base acts as the support structure for the TURTLE. It provides a stiff foundation to transfer all forces on the robot to the ground and simultaniously provide space for important hardware like the Beckhoff Ethercat stack, Batteries, High Voltage Supply, Motors, Amplifiers and other electronic devices.
- Author: CST Group, TU/e
- License: CERN OHL v.1.1
- Repository: https://gitlab.tue.nl/tech-united-eindhoven/rop/-/tree/master/TURTLE
- Software: https://gitlab.tue.nl/tech-united-eindhoven/Turtle3
Overview
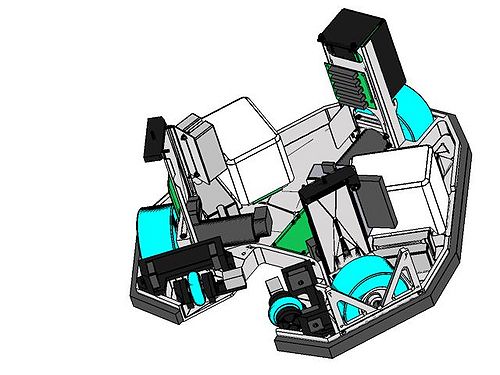
Figure 1 shows the CAD model of the fully assembled base.
Mechanics
Base
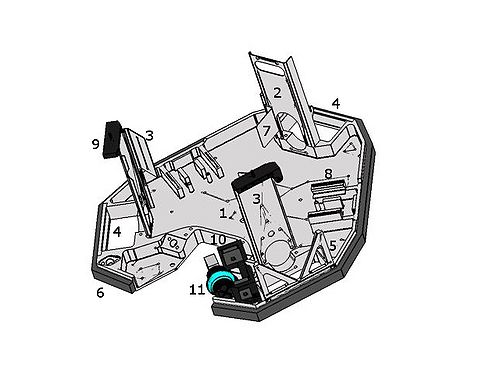
Figure 2 shows the mechanical base frame of the Turtle without electronics. Some components which are found symmetrical in the design are only visualized on one side, in order to give a better view of the design.
The base plate (1) is a milled aluminum (Dural 7075-T6) part and is the main component of the base frame. This base plate consists of a bottom plate with a thickness of 5 mm and raised edges with a height of 25 mm at the perimeter of the plate. On top of this base plate, three plates (AL-51ST) are assembled with bolts which make the connection to the upper body. One of these is the back plate (2) and two of them are side plates (3).
Three wheel protectors (4 and 5) from Dural 7075-T6 are bolted to the raised edges. One wheel protector (5) is different in order to also protect the laser range finder which will be discussed in the section ‘Ball handling and kicking mechanism’. On the outer perimeter, a strip of impact rubber (6) is assembles in order to cope with impacts during a match.
An extra protection plate (7) is assembled to the back plate (2) in order to protect the electric wiring, originating from the EtherCAT stack, from getting stuck in the rear omniwheel.
Blocks (8) of AL51-ST are used to clamp the batteries to the base plate, together with six steel M3 x 20 Allen bolts for every battery.
On top of both side plates (3), damper holders (9), again from AL51-ST, are mounted together with shafts from 34CrNiMo6 steel in order to hold the dampers for the ball handling system. In these damper holders, M5 threaded rods are screwed to make the connection to the upper body of the Turtle.
Furthermore, a connection block with rubber base blocks (10) is assembled on the base plate to make a connection with the ball handling mechanism.
Finally, two ball holders (11) are assembled on the front of the base plate, which is already part of the ball handling mechanism. The ball holders will be discussed in the Ball Handling and Kicking Mechanism section.
Electronic Components Mounted on the Base Frame
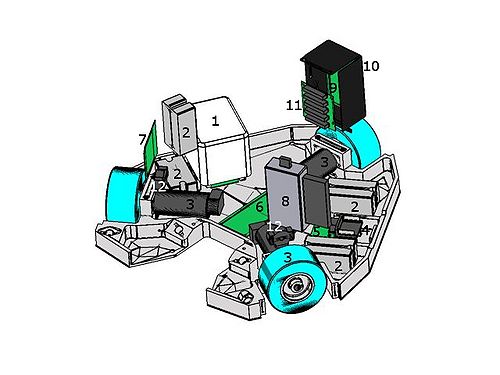
Figure 3 shows the positioning of the electronic components that are mounted on the base frame. More information about the electronic components and PCB's will be given in the electronics chapter. The mounted components are:
1. 2 x Makita Ni-MH (BH2433) batteries.
2. 3 x Elmec Violin 25/60 Amplifiers; 1 x Elmec Violin 5/60 Amplifier (hanging)
3. 3x Maxon Motor RE40 12 V 150 W motors with GP 42 C 12:1 planetary gearhead and HEDS 5540 encoders.
The maxon motors are clamped on the base plate using a motor mount block and two M5 x 35 Allen nuts (ISO 4762). The wheel is a simplified representation of the real omniwheel, that will be discussed in the next section.
4. 2 x Battery connector
5. 2 x Battery PCB (see electronics section for more details)
6. DC–DC PCB (see electronics section for more details)
7. Power supply PCB (see electronics section for more details)
8. EtherCAT stack
9. Shooting PCB (see electronics section for more details)
10. High voltage unit
11. PCB high voltage unit
12. Potentiometer for angle measurement of ball receivers: Vishay 971-0002 Rotary position sensor, 5 kOhm
Omniwheels
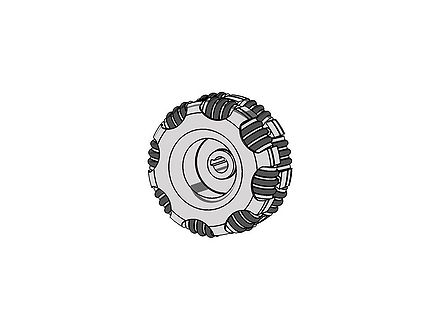
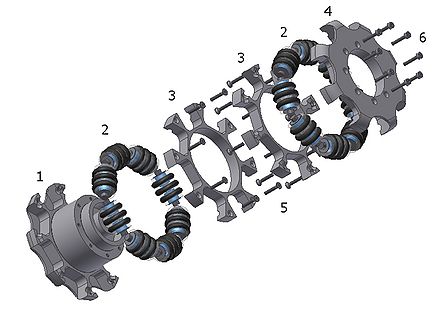
Currently, custom made omniwheels are used on the Turtles. The assembly and exploded view are depicted in Figures 4 and 5 respectively.
The inner ring (1) from aluminum is used to support two rings of each eight rollers (2). Each ring of rollers (2) is held together using two aluminum rings (3). The left ring of rollers in Figure 5 is bolted with BS 4618 Hexagon sockets (5) on the inner ring (1), while the right ring of rollers is bolted with BS 4618 Hexagon sockets (5) on the aluminum outer ring (4). The total omniwheel is assembled by bolting the outer ring (4) to the innner ring (1) using ISO 4762 M3 x 16 Allen bolts (6).
One smaller roller is fitted with three O-rings; two 16 mm inner diameter O-rings on the outside and one 17 mm inner diameter O-ring in the middle. Two needle roller bearings (INA HK0609) are placed inside each roller on a 6 x 32 mm shaft to ensure smooth rolling. At the start and the end of the shaft, 12 x 6 mm shims with a thickness of 0.5 mm are used as spacers.
License
Copyright Eindhoven University of Technology 2012.
This documentation describes Open Hardware and is licensed under the CERN OHL v. 1.1.
You may redistribute and modify this documentation under the terms of the CERN OHL v.1.1. (http://ohwr.org/cernohl).
This documentation is distributed WITHOUT ANY EXPRESS OR IMPLIED WARRANTY, INCLUDING OF MERCHANTABILITY, SATISFACTORY QUALITY AND FITNESS FOR A PARTICULAR PURPOSE. Please see the CERN OHL v.1.1 for applicable conditions.


